Showing posts with label tip of the week. Show all posts

Thursday, September 22, 2011

Freebie Font Fun!


I have an admission to make.  I love fonts!  I'm actually somewhat of a font hoarder and I can spend more time than I care to admit searching through my collection to grab the perfect choice for my journaling or title.  I especially love when I can build my font library for FREE!  Today, I wanted to share a couple of cool free font sites and some of the fonts I seem to use over and over.

A few font sites:

And I actually found a couple of fonts on the home page of one of these sites (Font Space) that I grabbed just while I was getting links for this post...


Now, here are a few fonts that I just love and tend to use often!  Now please keep in mind that I could go on and on with this list and I feel like I'm slighting my other fonts by not putting them in this list.  However, I'm trying to keep the post short in the interest of time, space and my desire to keep you awake.   I will also limit the list to free fonts although many I use were not free (but definitely inexpensive).  Also, please note that many of the free fonts can be found in several places... this is just one option.

Baby Boston from Kevin & Amanda
Basic Font from dafont - I use this one a lot to make my own PERSONAL USE alphas for my pages.
Birth of a Hero from 1001 Free Fonts (another great title font)
Blackjack from Font Squirrel
Glider Girls from Kevin and Amanda
Journaling Hand from Typedelic
Pea Jacks and Matty from Fonts for Peas
Scriptina from dafont
the Blue Cabin from Kevin and Amanda
Traveling Typewriter from Urban Fonts

OK, that's all!  I hope you found something you can use for your scrapbook pages and other things.  Just don't spend too much time searching, it can eat up your day, LOL!  And don't forget to check out the terms of use for these fonts.  They are all Personal Use Only, and are tons of fun.

Share with us about your favorite fonts.  We'd love to hear about it.


Thursday, August 25, 2011

Tip of the Week: Levels


So, what's up with levels? Even if you are a novice to editing photos, you have probably heard of this. But do you actually fiddle with the "levels" on most of your photos? Probably not. But if you did, you'd be very pleased with the results. It doesn't require any fancy actions (although those are super cool and I'll try to hit on those sometime in the future) and it is simple enough for anyone who understands layers in PSE or Photoshop to use, and use regularly.
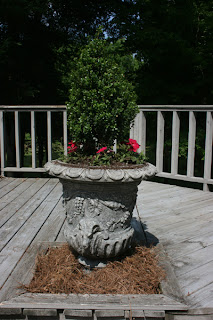

So, here is my photo. No comments on the composition or subject. I had just planted this on my deck and was mighty proud :). P.S. it is still alive and thriving. Yay, me!


To adjust the levels you can use a new adjustment layer (the little circle next to the "Create New Layer" square in PSE) and choose Levels from the pop up choices. OR more simply you can click on Enhance -> Adjust Lighting -> Levels. Again, this is in PSE 9 on a Mac but I'm sure it is similar in other versions of PSE.


In Photoshop, I believe it is Images -> Adjustments -> Levels. Unfortunately, this is from internet research and not experience *insert whimper here*.


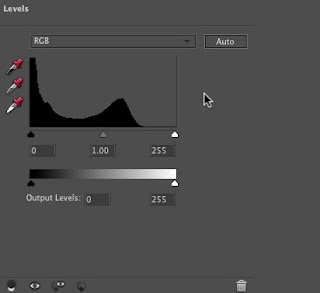
Regardless of how you get there, here's the screen you will see..


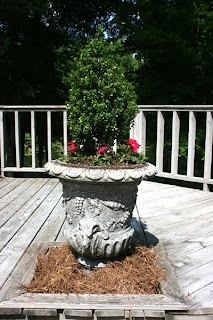
You will want to adjust the little triangle and watch the magic happen. In general, you will pull the slider in the direction needed to get rid of the flat line. In my case above, I pulled the right slider towards the left and ended up with this...


And Voila... my image looks better.


Try it sometime! You will be happier with your scrapbook pages if you are happy with your photos.


Thursday, August 11, 2011

Tip of the Week: Recipe Fun

So, how many of us have a "Recipe" Bookmark on our computer with tons of awesome recipes we either want to try or have found to be a hit with our families? *raising my hand* And how many of us have scribbled recipe cards where the ink is fading and it's getting difficult to distinguish between the Tsp and the Tbsp? (big difference, by the way) *raising my hand* Well, the tip today is to do something about it!

Use your copy and paste miracle or bite the bullet and type the thing out... but get those family and new recipes onto your hard drive and spitting out of your printer! And if you really want to be impressive, grab your camera after you create your culinary masterpiece (ie... mac 'n cheese) and snap a picture of it for the recipe card. Because as scrapper, none of us will be satisfied with a simple word document.

Oh no! It must be pretty :)... and I have a great tool to get you started. DaniMoy has these great Recipe Templates for sale. They are perfect to start the ball rolling. Or create your own templates. But having a few simple templates to work from will help you when you are ready to sit down and document the recipe.

Then find a great Cooking Kit (or two) to use so the card, or page will be pretty. Dani has one of those, too, called Cook With Me. How convenient, hehe...

Remember that DaniMoy's ENTIRE store at Scrapbook Bytes, Scrapbooks Gone Digital, and Gotta Pixel are on sale now for 40% off until 8/15. Now is the time!

So, here's what I came up with for my first "pretty" recipe page using Dani's template and Cook With Me kit. I plan to add to this book as I go until it is brimming with my yummies. Oh, and when Gift Time rolls around, how cool would it be to print these off for a friend or family member. Special, lovely and relatively easy!

Go for it, Ladies... I'd love for you to link us up to show off what you come up with, or share any other Recipe tips you have. I just love comments :)... I'll see you next week.


Thursday, July 28, 2011

TIP of the Week: Rounding Corners

Have you ever wanted to add a little something, something to your page. How about rounding off some corners? You can do this with photos, papers, clipping masks, elements... the list goes on. There are several ways to do this, but here's one way that's pretty simple. I used PSE for Mac if you don't recognize the screen shots.

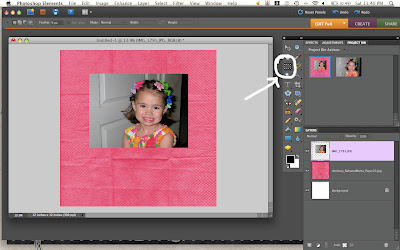
The first step is the choose the item that you want to have rounded edges. Stunning start to this tutorial, right? hehe (I've chosen this adorable photo of my daughter in her multiple hair bow phase as the example, just because it's cute) Then use the marquee tool to select a square or rectangle around your picture or paper.

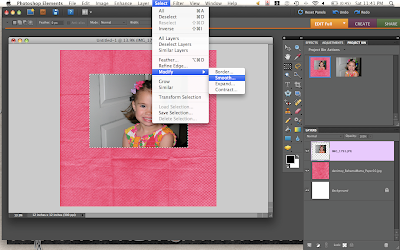
Then in the drop down menu, choose Select - > Modify - > Smooth.

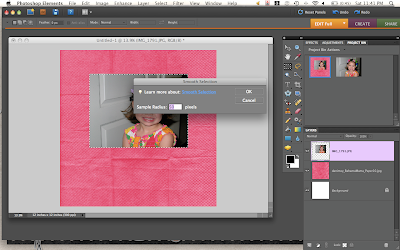
You will get a pop-up then. Not a bad one, I promise... You will need to choose a number of pixels. You can start with 50, although in my example I used 75.

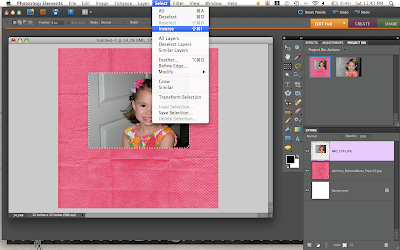
The next part is the fun part. In your drop down menu choose Select - > Inverse then click your Delete button. Fun, huh?

Now, go to the menu and choose Select - > Deselect and you are done!

Before I leave, don't forget about Dani's awesome Christmas in July Bundle! There are SO MANY Holiday goodies in this bundle for a fantastic price (75% off). Seriously, you just have to check it out. Maybe you can even find an excuse to round some corners *wink*.


See you next week...